TV Help
Traditional Cable TV
Using Your Traditional Cable TV Remote
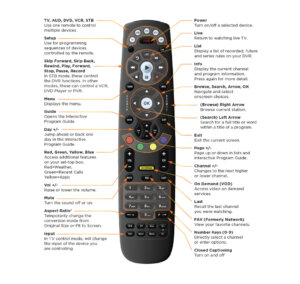
For more information about how to use your remote, tune to CLtel TV channel 999.
What’s on TV?
When you first turn on the TV, there are three easy ways you can see what is currently showing. You can use the OK button, the Info button or the Browse button.
Using the OK Button (Now Playing)
- Press the OK button on the remote control. You will now see the title of what you are currently watching, the channel name and number, the current temperature outside, the date, and the time.
Using the INFO Button
- Press the INFO button on the remote control. You will now see the title of what you are currently watching, a progress bar denoting how much time remains in the show, a preview of what is on next, the channel name and number, the current temperature outside, the date, and the time.
- If you are viewing a live program you can press the right/left arrow buttons to view what is showing later on the current channel. Or, press the up/down buttons to view what is showing on another channel.
- Press the Day + and Day – buttons to see what is on this channel, 24hours from now.
- Press the INFO button a second time (in quick succession to the first). You will now see a description and other details regarding the show you are watching.
Using the Browse Button
- Press the Browse (right arrow) button on the remote control. At the top of the screen, you see the channel you are currently tuned to. At the bottom of the screen you see the channel number, channel name, current date and time, program name, date and time the program airs, a progress bar showing how far along the program is, and the program that airs next.
- Press the right/left arrow buttons to view what is showing later on the current channel. Or, press the up/down arrows to view what is showing on another channel.
- Press the Day + and Day – buttons to see what is on this channel, 24 hours from now.
For more information, tune to channel 999.
Using the Channel Guide
The Channel Guide is your on-screen tool to see what is on TV and allows you to surf channels while still watching a program.
Using the Guide Button
- Press the Guide button on the remote control. Information about the program you are tuned to displays at the top of the screen along with indicators if the show is in HD, if the program is a new episode, and if the broadcast is in HD. Other channels and their programs will show at the bottom of the screen. Shows that started prior to the current time slot are indicated with a blue arrow prior to the program name. Shows that continue past the last time slot shown on the guide are indicated with a blue arrow after the program name. Programs scheduled for recording will be marked with a red circle.
- To move through the guide one channel at a time, press the up/down arrow buttons on the remote control. As you do this, a description of the highlighted program will display at the top of the screen. Or, press the Channel + and Channel – buttons to scroll through the channels more quickly.
- To move through the guide one page at a time, press the Page + (up) and Page – (down) buttons on the remote control.
- To move through the guide one screen at a time, use the fast forward and rewind buttons.
- To move through the guide a full 24 hours, press the Day + and Day – buttons on the remote control. You cannot use the Day – button to go back in time. However, you can use it to page back if you have moved ahead in the guide.
- To see programs you missed, press the Skip Back button to go back one page in the guide. If there was a program you missed, you could search for other programs of the same name and schedule the PVR to record the program.
- While in the Guide, if you press the Guide button a second time, you can view the guide in Channel Guide view where similar information is displayed in a different format.
- To browse through the guide using a Favorites list, press the blue button or the Favorite Menu. The list name will appear at the bottom of the screen. Keep pushing the blue button to scroll through the different Favorites lists.
- To Exit the Guide, either press the Guide button a third time or press the Exit button on the remote control.
Changing the Number of Rows and Columns in the Guide
By default, the guide will display 4 rows and 4 columns of programming information. Depending upon the size of TV you are viewing and your preferences, you may want to show more or fewer columns and rows.
- The settings are changed by accessing Main Menu – My Settings – Guide Settings. Arrow down to change the Number of Rows and the Number of Columns.
For more information, tune to channel 999.
Creating a Favorites List
If you like to be able to surf within only a specific set of channels, you can create Favorites lists. By default, your set-top has grouped channels into several pre-set Favorites lists including: All Channels, Subscribed Channels, Movie Channels, Sports Channels, Music Channels, Entertainment Channels, Kids Channels, News Channels, Business News Channels, Infotainment Channels, Religious Channels, Regional Channels and HD Channels. You may create up to five additional Favorites lists.
- Press the Menu button to access the Main Menu. Arrow right and then down to highlight Edit Favorites and then press OK.
- If you are not already in a ‘New List’ by default, arrow right to access a New List.
- All available channels will display. Use the up/ down arrow buttons on the remote control to move through the list of channels. When you are on a channel you want to add to your list, press the OK button to mark it as part of this Favorites list.
- To name the list, press the Yellow button on the remote control.
- Use the arrow buttons to move through the letters on the screen. Press OK on the remote control to choose a letter. When you have named your list, arrow down to select the submit button to accept your name.
- To Save your favorites list, press the Blue button on the remote control and then press OK.
- To Discard a favorites list, press the Red button on the remote control.
- Press the Exit button on the remote control to leave the menu.
Folder List Actions
To view the available Actions associated with each Favorites List, press the Green button on the remote control. The Actions list displays on the right side of the screen. To make it easy for you, the list of Actions on the screen shows the corresponding button that you could press on the remote control. You can also highlight your selection and then press OK on the remote control.
- Selecting the Discard Changes option will exit Edit Favorites without making any changes.
- Rename List allows you to change the name of this list without changing the channels that were previously selected for this list.
- Save List will save any changes made to this Favorites List.
- Delete List will delete this list from your Favorites.
- Invert List lets you select or deselect channels in this Favorites List. For example, if you have selected 10 channels in this Favorites List and click OK on Invert List, those 10 channels will be deselected and all of your other subscribed channels will be selected. If you click OK again those 10 previously selected channels will be back in the list while the rest of the subscribed channels will be removed.
Access a Favorites List for Surfing
- Press the FAV button on the remote control.
- All Favorites lists will display. Lists that you have created will display with a star.
- Arrow down to highlight the Favorites list you want to use and then press OK on the remote control. The list you have selected will show just above the channel number.
- With the favorites list selected, you will browse channels only within that list.
For more information, tune to channel 999.
Search
There are Search capabilities that allow you to either search for a full title of a program or for a word or two within a title. You can use the Search tool in the Guide to find all instances of a program by title. Or, you can use the Search feature to enter a partial name and search for all instances of the word to locate the desired program. This works well if you can’t recall the full name of a program or movie.
Perform a Title Search Within the Guide
- While viewing the Guide, select the desired program using the arrow buttons, then press the Search button (yellow button) on the remote control.
- This will perform a full title search to return all shows with the same title. In this example, the search found all shows titled “Ace of Cakes.”
- If there is a program in the search results you would like to record, you may schedule a recording from the list of search results. Use the up/down arrows to highlight the program and press Record or OK on the remote control. Follow the steps to schedule a recording.
Perform a Partial Text Search Using the Search Button on the Remote Control
- While viewing any program (and not in the Guide or other menus), press the Search button (left arrow) on the remote control. This will display a search window where you can enter the first few letters or one or two words in the program title.
- Use the arrow keys on the remote control to highlight the letters and press OK to select a letter. When you have entered all the text, arrow down to Submit and press OK or just push the yellow button to start the search.
- In this example, the user has searched for all programs with the word ‘dog’ in the title.
- If there is a program in the search results that you would like to record, you may schedule a recording from the list of search results. Simply use arrow buttons to highlight the program and then press OK or Record on the remote control. Follow the steps to schedule a recording.
- You may also continue to search for more programs by the same name. In this example, selecting “Snow Dogs” and pushing the yellow button will search for all scheduled airings of “Snow Dogs”.
For more information, tune to channel 999.
Pause and Restart Live TV
If you subscribe to DVR service, in addition to recording future shows, you have the freedom to control Live TV. Each time you tune to a channel, the DVR begins making a temporary recording of the program you are watching. This gives you the ability to Pause the current program if the phone rings and the freedom to rewind or instant replay a scene that you just have to see again. Your DVR will record up to one hour of Live TV. Use the Skip Forward, Skip Back, Rewind, Play, Forward, Stop, Pause, Record buttons to control Live TV.
Most (but not all) content providers (i.e. the television networks themselves) also allow Restart TV. If you notice that a show that you wanted to watch is almost over, or that you missed the first few minutes, you can restart the show from the beginning. Simply:
- Press the GUIDE button.
- Highlight the channel that you want to restart.
- Press the green button on the remote. Unless it is prohibited by the content provider, the show will be restarted from the beginning.
Important note: a show that has been restarted cannot be fast forwarded.
It’s important to understand that Live TV recording is not permanent. Unlike recording a program on your DVR to watch later, the DVR records Live TV in a temporary storage or a buffer. For Live TV recordings, this temporary recording (buffer) will be erased if any of the following occur:
- You turn off your DVR.
- You watch the same channel for longer than the temporary recording buffer period. The most recent hour of the program (less for HD) is kept in the temporary recording.
- You switch to another program. When you change channels, your DVR begins to store the new program. It removes the previous program you were watching from storage.
Please also note that some content providers (i.e. the television networks themselves) may not allow certain aspects of pausing, rewinding, and restarting Live TV. If that is the case, you will simply not be able to conduct that specific action on that channel.
Status Bar
The status bar appears whenever you Skip Forward, Skip Back, Pause, Rewind, or Fast Forward a live or recorded program. It gives you information such as the channel you are viewing, the title of the program you are watching, and the length of the live buffer.
Pause
As you watch live TV or recorded programs, press Pause and the programming on the screen instantly freezes. Press Play to resume normal play of the program from the point where it was paused.
Rewind
Do you need to see something again? Press Rewind. Press it again up to 4 times to increase the rewind speed. x4, x15 and x60 and x300 will display next to the status bar. x4 is the slowest setting and x300 is the fastest. To slow the Rewind speed, press the Fast Forward button. At the point that Rewind is slowed as far is it goes, you will return to normal mode and then Fast Forward mode. Press Play to resume normal play directly.
Fast Forward
Press Fast Forward to move forward in a recorded program. Press it again up to 4 times to increase the fast forward speed. x4, x15, x60 and x300 will display next to the status bar. x4 is the slowest setting and x300 is the fastest. To slow the Fast Forward speed, press the Rewind button. At the point that Fast Forward is slowed as far as it goes, you will return to normal mode and then to Rewind mode. Press Play to resume normal play directly. For programs you are watching live, Fast Forward will be activated if you have paused or rewound the program.
Skip Back
With Skip Back, you can go back to see the last play of the game or replay the last scene of your movie. Just press the Skip Back button on your remote control to replay the last 10 seconds. Press the replay button repeatedly to continue skipping back in 10 second increments.
Skip Forward
With Skip Forward, you can go jump forward by 30 seconds in your program.
Return to Live TV
Any time you Pause or rewind a live program, the show continues to be broadcast in real time and saved in the buffer. To return to live programming, press the Live button.
For more information, tune to channel 999.
Attempting to Watch a Locked Channel
If you have locked channels from view, you will need to enter a PIN in order to access programming on that channel. See the “Settings and Parental Controls” section for instructions on locking channels.
- Imagine the TV is tuned to channel 33. An attempt to enter channel 11 is indicated in green in the browser bar.
- Imagine that you previously locked channel 11. Because channel 11 is locked, you are prompted to enter a PIN. Until you change it through the My Settings Menu, the default PIN is 0000.
- The Enter PIN screen will remain until a correct PIN is entered or until you press Exit.
- Pressing Exit will bring up a screen indicating an invalid PIN was entered. Press the Guide button to browse for another program to watch.
This same result happens when selecting a locked channel from the Guide.
For more information, tune to channel 999.
Attempting to Watch a Program Beyond the Parental Rating Settings
If you have set parental ratings in order to prevent viewing shows beyond a rating that you find acceptable, you will need to enter a PIN in order to access programming beyond your specified rating. See the “Settings and Parental Controls” section for instructions on setting parental controls.
- From the Guide, if you attempt to view a program that is rated beyond the viewing limits that you have previously set, you will be prompted to enter a PIN.
- The Enter PIN screen will remain until a valid PIN is entered or until you press Exit.
- Pressing Exit will bring up a screen indicating an invalid PIN was entered. Press the Guide button to browse for another program to watch.
This same result happens when keying a channel number on the remote control.
For more information, tune to channel 999.
Caller ID and Message Waiting Indication on the TV
If you are subscribed to Caller ID, it is possible to have your Caller ID information display on the TV as it displays on your regular Caller ID device. Also, it is possible to have a voicemail waiting indication show on your TV.
Press the Green button at any time to see your Caller ID Recent Calls list. This handy feature allows you to review a list of phone numbers that have called your wireline phone service. To delete numbers from your recent calls list use the arrow button to highlight the number you want to delete and press the red button on your remote.
For more information, tune to channel 999.
Traditional Cable Boxes
The Amino Kamai 7B is the most recent generation of CLtel TV Traditional Cable Box. s are called the Amino Kamai 7B. With ultra-crisp picture and sound and available whole-home cloud DVR, Pause Live TV, Restart TV, and more, these traditional cable boxes deliver the great traditional cable TV experience you expect. Click here for more information on these excellent devices.
Please see the Troubleshooting section below if you are experiencing trouble with your cable box.
DVR
Introduction
DVR service gives you freedom to record your favorite programs and watch them on YOUR schedule. Using the buttons on the remote control, you can forward past parts you don’t want to watch and rewind to watch the things you want to see again.
You even have the freedom to control Live TV. Each time you tune to a channel, the DVR begins making a temporary recording of the program you are watching. This gives you the ability to Pause the current program if the phone rings and the freedom to rewind or instant replay a scene that you just have to see again. Your DVR will record up to one hour of Live TV.
It’s important to understand the Live TV recording is not permanent. Unlike recording a program on your DVR to watch later, the DVR records Live TV in a temporary storage or a buffer. For Live TV recordings, this temporary recording (buffer) will be erased if any of the following occur:
- You turn off your DVR.
- You watch the same channel for longer than the temporary recording buffer period. The most recent hour of the program (less for HD) is kept in the temporary recording.
- You switch to another program. When you change channels, your DVR begins to store the new program. It removes the previous program you were watching from storage.
Please also note that some content providers (i.e. the television networks themselves) may not allow certain aspects of pausing, rewinding, and restarting Live TV. If that is the case, you will simply not be able to conduct that specific action on that channel.
Record Programs
Your DVR service gives you the freedom to record the program you are watching as you are watching it, record a program while you watch another, or you can record a program you see in the program guide. You can also schedule a series recording so you always catch all episodes of your favorite programs.
Note: If a program you record is either locked by parental rating settings or on a channel that is locked, the DVR service will record the program but you will be required to enter a PIN to view it.
Record What You Are Currently Watching
If you are watching a program and decide that you want to record the remainder of the program you can easily start the recording.
- While watching a program, press the Record button on the remote control.
- Choose whether this is a one-time recording, a series recording, or select cancel to not set a recording.
- Customize your recording selections for start and stop time and which folder to save the recording to.
- At the bottom of the record options is the ability to Record from Start. That will permit you to record the portion of the program you missed.
- You can also use the Reminder function from this screen. Choose reminder if you would like your television to remind you when the program is going to air, when a new episode of the program is going to air, or every time the program will air. You may set the reminder for 1, 2, 3, 4, 5, 10 or 15 minutes prior to the program start. You can also choose to have the television automatically tune to the channel when the recording starts. More information on setting Reminders can be found later in this guide.
- A Red circle will briefly display in the top right of the screen indicating you are recording the program.
- If you decide to stop recording the program before it is complete, press the Stop button. Choose from the options regarding how to save the partial recording. The options are:
- Stop Recording and Keep – Saves the recording for future use.
- Stop Recording, Keep and Protect – Saves the recording and protects it from automatic deletion.
- Stop Recording and Delete – Deletes the recording from memory.
- Continue Recording – Does not stop recording the program.
Create a One-Time Recording from the Guide
Whether you are choosing a program from the Guide or if you are currently viewing the program when you decide to record it, the process to create a one-time recording is the same.
- From the Guide, highlight the program you want to record and press the Record button on the remote control. The recording options will display.
- Choose to create a one-time recording.
- Use the arrow keys to customize start & stop times, folder to save the recording to, and auto tune preferences.
- Arrow down to “Create One Time Recording” and click OK on your remote control.
- A Red circle will display in the guide indicating the program will record.
- You will also be able to find the recording in the Future Recordings list.
- If you change your mind and decide against recording the program, with the program highlighted on the guide, press Stop on the remote control and the Red circle will be removed indicating the program will not record.
- At the bottom of the record options is the ability to Record from Start. That will permit you to record the portion of the program you missed.
Record a ‘Live’ Event (Live sporting event, award show, etc.)*
Recording a Live Event is essentially the same as recording any other program. However, since there is a chance of a live event running longer than originally scheduled in the programming guide, you have the option to record up to one hour longer in order to be sure you record all of the event. An example would be a major league baseball game or football game.
- From the Guide, highlight the program you want to record and press the Record button on the remote control. The recording options will display.
- The DVR service recognizes from the program guide information that this is a live broadcast and warns you that it may extend past the designated end time. Use the left/right arrow keys to choose to Stop Recording by 15 minutes, 30 minutes, or 60 minutes.
- Arrow down to Extend Recording and press OK on the remote control.
*Note: Live programming options will only be available when the Guide Data flags the programming as “live” programming.
Record a Series from the Guide
Whether you are choosing a program from the Guide or if you are currently viewing the program when you decide to record it, the process to create a series recording is the same:
- If you have found a program that you would like to record in the Guide, highlight it and press the Record on the remote control. The recording options will display.
- Arrow over to select Series and press OK on the remote control.
- The Series Recording Options will display.
- Choose how many episodes to Keep at Most any given time. Options are 1 – 10 or All episodes. . Use left/right arrow buttons to make your selection.
- Choose the Show Type that you wish to record. You may choose to record All episodes of a program or just New episodes.
- Choose when to Start Recording. You can begin ‘on time’ when the program is scheduled to begin. Or you can use the arrow buttons to choose 1, 2, 3, 4, 5,10, 15 or 30 minutes early.
- Choose when to Stop Recording. You can stop ‘on time’ when the program is scheduled to end. Or you can use the Browse/Arrow (Left or Right) buttons to choose 1, 2, 3, 4, 5,10, 15, 30, or 60 minutes late.
- Finally choose the Folder where you want to save the recording. By default the folder will be ‘All Recordings’ but you may choose another existing folder or create a new folder.
- Arrow down to Create Series Recording and press OK on the remote control to save your changes. To Cancel your changes, push Exit or highlight Cancel and press OK on the remote control.
- A Red circle with an ‘S’ will display in the guide indicating that the program is part of a series recording.
- You will also be able to see the scheduled recording in the Future Recordings list as well as in the Series Rules list.
For more information, tune to channel 999.
Watch a Recorded Program
- To access the list of recorded programs, press the List button on the remote control.
- From the list of recordings, use the up/down arrow buttons to choose the folder containing the recorded program you wish to watch. When you highlight a program, it expands to show more information, or you may need to press the Info button depending on your configuration.
- To start playback of the recording, press the Play button on the remote control.
- If the program is one that you had previously viewed and stopped in the middle, you will be asked if you would like to Resume playback from where you left off or if you would like to Restart from the beginning or if you would like to Exit and return to the Recordings List.
- As you play back a program, you have the ability to Fast Forward, Rewind, Pause, Replay, Jump Forward, Jump Backward or Stop the playback. The Status Bar appears at the bottom of the screen.
- When you reach the end of the program, you will be asked if you would like to delete the recording. Choose either Yes or No.
For more information, tune to channel 999.
Reminders
Your television can be set to remind you when a program is about to air and to automatically tune to a program you don’t want to miss.
- To set a reminder, press the Guide button and use the arrow buttons to find and highlight the upcoming program you wish to flag with a reminder. Press the Record button on the remote.
- Arrow over to select Reminder.
- Customize your settings for a one-time reminder, reminders only when a new episode will air, or a reminder for all program airings. You can also select how many minutes before the program starts you want your reminder to appear (1, 2, 3, 4, 5, 10 or 15 minutes early), and whether to automatically tune to the channel when the program begins. Arrow down to highlight Create Reminder and press OK on the remote.
- A reminder icon will appear next to the program on the guide to indicate a reminder has been set for that program.
- A reminder pop-up will appear at the top of your TV screen at the time you designated. Press OK to begin watching the program at any time or wait for it to change channels automatically if you set the auto tune feature.
For more information, tune to channel 999.
Folders
Folders allow you to organize the recordings on your DVR service by user, program type, or any other way you may choose.
To create folders, simply choose the [New Folder] option any time you are setting a new recording. Arrow down to select Create One Time Recording and select OK on the remote.
You will then be prompted to name the folder.
Once the recording is complete, it will be placed in the designated folder and you can access it by pressing the List button.
To move a program to a different folder, find the recorded program by pressing the List button. With the program selected, press the green button to reveal List Action options and choose Move to Folder and select the desired folder.
For more information, tune to channel 999.
Status Bar
The status bar appears whenever you Skip Forward, Skip Back, Pause, Rewind, or Fast Forward a live or recorded program. It gives you information such as the channel you are viewing, the title of the program you are watching, and the length of the live buffer.
Pause
As you watch live TV or recorded programs, press Pause and the programming on the screen instantly freezes. Press Play to resume normal play of the program from the point where it was paused.
Rewind
Do you need to see something again? Press Rewind. Press it again up to 4 times to increase the rewind speed. x4, x15 and x60 and x300 will display next to the status bar. x4 is the slowest setting and x300 is the fastest. To slow the Rewind speed, press the Fast Forward button. At the point that Rewind is slowed as far is it goes, you will return to normal mode and then Fast Forward mode. Press Play to resume normal play directly.
Fast Forward
Press Fast Forward to move forward in a recorded program. Press it again up to 4 times to increase the fast forward speed. x4, x15, x60 and x300 will display next to the status bar. x4 is the slowest setting and x300 is the fastest. To slow the Fast Forward speed, press the Rewind button. At the point that Fast Forward is slowed as far as it goes, you will return to normal mode and then to Rewind mode. Press Play to resume normal play directly. For programs you are watching live, Fast Forward will be activated if you have paused or rewound the program.
Skip Back
With Skip Back, you can go back to see the last play of the game or replay the last scene of your movie. Just press the Skip Back button on your remote control to replay the last 10 seconds. Press the replay button repeatedly to continue skipping back in 10 second increments.
Return to Live TV
Any time you Pause or rewind a live program, the show continues to be broadcast in real time and saved in the buffer. To return to live programming, press the Live button.
For more information, tune to channel 999.
Delete a Recording
In addition to the option to delete a recording when you have finished viewing it, there are other options for deleting a recording.
- To access a list of recorded programs, press the List button on the remote control.
- From the list of folders, choose the folder that contains the recordings you want to delete and use the arrow keys to highlight the entire folder or the individual episode you want to delete.
- Press the Red button to Delete the recording or group of recordings. Or, press the Green button to access the Actions menu and then choose Delete. You have the option to cancel the process.
For more information, tune to channel 999.
Using the List Button
To see the list of current recordings, you can tap Press Menu > Recordings > Current.
Current Recordings
The All Recordings folder appears first and includes all of the recordings you have stored with your DVR service. If grouping is enabled in your setting, each program will also have a folder including all recordings of that program. To move in and out of the folders, use the left and right arrow buttons. At the top of the screen you see the number of folders and the amount of space you have available.
When you are in a program folder:
- Delete a recording by pressing the Red button on the remote control.
- View the available Actions by pressing the Green button on the remote control. Actions include Play Recording, Edit Item, Information, Go Back, Move to Folder, Protect, Sort List, Close Actions and Delete Recording.
- Search for programs within the Recording folders by pressing the Yellow button on the remote.
- Sort the Current Recordings by pressing the Blue button on the remote control. By default, Current Recordings are displayed by date and time. If you press the Blue button, programs will be sorted by Name.
- Press the Skip Forward button to view recordings by title rather than group.
Current Recording Actions
To view the available Actions, press the Green button on the remote control. The Actions list displays on the right hand side of the screen. To make it easy for you, the list of Actions on the screen shows the corresponding button that you could press on the remote control. It is also possible to highlight your selection and then press OK on the remote control.
- To Play the Recording, press the Play button on the remote control.
- To extend the end recording time on a recording in progress, use the Edit Item button.
- To show or hide Information about the recording, press the Info button. This expands or hides the view of information. Simply highlighting a recording and pausing for a brief moment will also display the information.
- To Go Back to the previous screen showing All Recording Folders, press the Left Arrow button.
- To Move the recording to a specific folder, select Move To Folder.
- To Protect a recording so that it does not automatically get deleted, use the Browse/Arrow (Up and Down) buttons to highlight the protect option and then press the OK button. When you do, a shield symbol will display next to the program name letting you know that this program is protected. If you want to remove protection from the recording, simply choose Protect again.
- To Sort the List of Current Recordings, press the Blue button on the remote control. At the bottom of the screen you will see the sort change to being sorted by Name. Press the Blue button again to change the sort back to date and time.
- To Close the Actions, either press the Green button or press the Exit button on the remote control.
- To Delete the Recording, press the Red button on the remote control. Select Yes or No to delete and then press OK.
Future Recording
To view your list of Future Recordings, choose Menu > Recordings > Future. These are programming events that are waiting to happen. At the top of the screen you see the number of recordings and the amount of space you have free.
When you are in a program folder:
- Delete a future recording by pressing the Red button on the remote control.
- View the available Actions by pressing the Green button on the remote control. Actions include Edit Item, Information, Go Back, Move to Folder, Sort List, Close Actions, and Delete Recording.
- Search for programs within the Recording folders by pressing the Yellow button on the remote.
- Sort the Current Recordings by pressing the Blue button on the remote control. By default, Current Recordings are displayed by date and time. If you press the Blue button, programs will be sorted by Name.
- Press the Skip Forward button to view recordings by title rather than group.
Future Recording Actions
To view the available Actions, press the Green button on the remote control. The Actions list displays on the right side of the screen. To make it easy for you, the list of Actions on the screen shows the corresponding button that you could press on the remote control. You can also highlight your selection and then press OK on the remote control.
- To Edit the Item, press the OK button on the remote control. You can change the time that you Start Recording and Stop Recording. This allows you to begin and/or end recording to allow for time padding around the program.
- To show or hide Information about the recording, press the Info button. This expands or hides the view of information. Simply highlighting a recording and pausing for a brief moment will also display the information.
- To Go Back to the Future Recordings Folder List press the List button.
- To Move the recording to a specific folder, select Move To Folder.
- To Sort the List of Future Recordings, press the Blue button on the remote control. At the bottom of the screen you will see the sort change to being sorted by Name. Press the Blue button again to change the sort back to date and time.
- To Close the Actions, either press the Green button or press the Exit button on the remote control.
- To Delete the Recording, press the Red button on the remote control. Select Yes or No to delete and then press OK.
Series Recording Rules
To view your Series Recording Rules, choose Menu > Recordings > Series. These are the programs that you have set to record on a regular basis. You can make adjustments to your series recording rules from this screen. At the top of the screen you see the number of Series Rules and the amount of space you have free.
- Delete a rule by pressing the Red button on the remote control.
- View the available Actions by pressing the Green button on the remote control. Actions include Edit Item, Information, Increase Priority, Decrease Priority, Sort List, Close Actions and Delete Rule.
- Search for programs in the recordings folders by pressing the Yellow button on the remote.
- Sort the Series Rules by pressing the Blue button on the remote control. By default, Series Rules are displayed by Priority. If you press the Blue button, programs will be sorted by Name.
Series Rules Actions
To view the available Actions, press the Green button on the remote control. The Actions list displays on the right side of the screen. To make it easy for you, the list of Actions on the screen shows the corresponding button that you could press on the remote control. You can also highlight your selection and then press OK on the remote control.
To Edit the Item, press OK and choose from these options to edit:
- Choose how many episodes to Keep at Most any given time. Options are 1 – 10 or All episodes. Use the Browse/Arrow (Left or Right) buttons to make your selection.
- Choose the Show Type that you wish to record. You may choose to record All episodes of a program or just New episodes.
- Choose when to Start Recording. You can begin ‘on time’ when the program is scheduled to begin. Or you can use the Browse/Arrow (Left or Right) buttons to choose 1, 2, 3, 4, 5,10, or 15 minutes early.
- Choose when to Stop Recording. You can stop ‘on time’ when the program is scheduled to end. Or you can use the Browse/Arrow (Left or Right) buttons to choose 1, 2, 3, 4, 5,10, 15, 30, 45, or 60 minutes late.
- Finally choose the Folder where you want to save the recording and whether you’d like your television to auto tune to the channel. Arrow down to Update Series Recording and press OK on the remote control to save your changes. To Cancel your changes, highlight Exit and press OK on the remote control.
- To show or hide information about the recording, press the Info button. This expands or hides the view of information. Simply highlighting a recording and pausing for a brief moment will also display the information.
- The priority of programs is represented by their order in the list. The top program on the list is the highest priority and the bottom one is the lowest priority. So, if you have several programs scheduled to record at once and the system is unable to provide resources to record all of them, the DVR makes the decision of which to record based on highest priority. To change Priority, simply highlight the Action to Increase or Decrease Priority and then press the OK button to adjust priority.
- To Sort the List of Series Rules, press the Blue button on the remote control. By default Series Rules are sorted by their Priority. You can change them to sort by Name. Press the Blue button again to change the sort back to Priority.
- To Close the Actions, either press the Green button or press the Exit button on the remote control.
- To Delete the Rule, press the Red button on the remote control. Select Yes or No to delete and then press OK.
For more information, tune to channel 999.
Watch TV Everywhere
What is Watch TV Everywhere?
Watch TV Everywhere allows you to watch TV, well, anywhere! As a CLtel TV customer, Watch TV Everywhere gives you access to TV shows, movies, behind-the-scenes content, and more at no additional charge. Once you’ve registered, download apps from your favorite networks for your smartphone, tablet, computer or smart TV and start watching.
Please note: not all networks have apps available for all platforms. Check your device’s app store to see what’s available. You can also visit www.watchTVEverywhere.com and click on a network to start watching.
The networks that you’ll be able to watch correspond with your TV subscription (i.e. you won’t have access to the networks exclusive to the Ultimate tier if you subscribe to the Enhanced tier). Please note: not all networks have content available through Watch TV Everywhere.
How do I sign up for Watch TV Everywhere?
- Visit www.watchtveverywhere.com
- Watch this demonstration video or follow these steps:
- Find your most recent CLtel bill. You’ll need this to reference your account number and the exact spelling of your name as it appears on your account.
- On the www.watchtveverywhere.com site, select CLtel from the Select Your TV Provider dropdown list, and click Register.
- Enter your account number and last name in the Subscriber Validation section.
- Complete the New User information section by providing your first and last name, a valid email address (where you will receive an activation link to complete registration), and your desired password. Check the I’m Not a Robot box, and click Submit.
- A message will appear in your inbox. Click the the link to confirm your email.
That’s it! You have officially activated your account. Contact us with any questions about the Watch TV Everywhere activation process.
*Please note: it is important that you keep your username and password confidential. Use of your credentials by others will result in loss of watchTVEverywhere privileges.
How do I use Watch TV Everywhere?
There are two ways to use Watch TV Everywhere:
- Visit www.watchTVEverywhere.com and log in. You will be presented with a list of networks that are available to you. Click on the network you want to watch. If the network you selected has an app available for your device, you will be directed to the app store to either open or download the app. Otherwise, you will be taken to the network’s website.
- Open a network app – Hallmark Channel, for example – directly on your device (smartphone, tablet, computer, etc.). Log in and start watching
For quick and easy access to all the networks available through Watch TV Everywhere, add the Watch TV Everywhere website to your device’s home screen.
How is Watch TV Everywhere different from other online video streaming services?
Watch TV Everywhere is included with your CLtel TV service at no additional charge! Watch TV Everywhere is an extension of your TV subscription and allows you to watch the same shows and programs you watch on TV from wherever you want, whenever you want.
Streaming services like Netflix and Amazon Prime Video only offer past seasons of shows so you have to wait to watch the current season. With Watch TV Everywhere, you can watch the current season of your favorite shows within days of their premiere. Most networks also make past episodes and “behind-the-scenes” videos available.
Subscription services like YouTube TV, SlingTV, or fuboTV are different in that they show live TV content only. They are essentially cable channels streamed over the Internet. You may also have access to other content through these services as well.
Many networks also include a live stream as part of their Watch TV Everywhere offerings.
How much does it cost?
Nothing! Watch TV Everywhere is a service included with yoru CLtel TV service at no additional cost. You’ll have access to networks that are part of your TV subscription. For example, if you receive ESPN as part of your TV package (Ultimate TV, Enhanced TV, etc.), you’ll have access to ESPN content through watchESPN.
Please keep in mind that overage charges may apply from your cellular carrier if you use your smartphone’s cellular data. Streaming video transmits a lot of data so it is very easy to go over your data plan. Check your cellular data plan before you start watching – OR – just use your CLtel Internet and Ultimate WiFi service instead of cellular, and you’ll never have to worry about overages because we have no data caps or overage charges.
Where can I use Watch TV Everywhere?
Just about Everywhere! Watch TV Everywhere works anywhere you can access the Internet: inside your house, at the office, shopping mall, hotel, airport or when you’re waiting in the car to pick up the kids. CLtel Internet and Ultimate WiFi connections will provide the best quality, particularly compared to a cellular network. The quality of streaming while connected to a public WiFi network, like at a restaurant, will vary depending on the strength of the signal.
WatchTVEverywhere.com and content authorized through Watch TV Everywhere is only accessible in the US and US territories.
What can I watch?
Each network determines what programs to make available, when and the length of time they are available. Watch TV Everywhere and participating cable providers have no control over what is made available. Generally, networks have the most recent episodes of TV shows as well as past episodes or seasons of TV shows available for you to watch. They may also include movies, behind-the-scenes content or special, web-only content. Some networks even include a live feed of the network.
Why aren’t all the networks I subscribe to available?
Not all networks and channels make their programs available online. As new networks are added, they will be added to the Networks page on watchTVEverywhere.com.
Why aren’t all programs available?
A TV network doesn’t necessarily own all of the rights to all of the programs they transmit. A TV network may have the right to transmit a movie, but only to TV sets, not on Watch TV Everywhere. So, once again, it depends on the TV network.
Will other networks become available?
Yes. Watch TV Everywhere continually works with networks to expand what’s available to you. To see a complete list of networks that are available to you, log in to www.watchTVEverywhere.com.
Which Watch TV Everywhere programs can I watch?
Once you are registered, you can watch any Watch TV Everywhere program as long as you are a subscriber to that network. For example, you must be a Disney Jr. subscriber to watch Disney Jr.’s Watch TV Everywhere programs.
Which devices can I use?
Almost all Watch TV Everywhere programs are available on computers and Apple or Android smartphones or tablets. Several TV networks also have applications for popular streaming devices like Apple TV, Roku, Google Chromecast and Xbox.
Some TV networks are not available across all platforms. Visit your device’s app store and search by the network name for available applications.
How many different devices can I use?
There is no limit to the number of devices you can use. However, TV networks may limit the number you can use at the same time. Please refer to the policies and terms of use for each app you use for details.
Does watching Watch TV Everywhere count against my mobile data plan?
It might. Check the data plan for your cellular service before you start using it to access Watch TV Everywhere. Watch TV Everywhere programs transmit a lot of data, which can become expensive if you have a limited data plan. To avoid that, just use your CLtel Internet and Ultimate WiFi service instead of cellular, and you’ll never have to worry about overages because we have no data caps or overage charges.
Will I be able to watch my Watch TV Everywhere programming content while traveling outside of the United States?
Programming and Distribution rights vary by programmer; however, as a general rule, rights are restricted to the US and US territories for content distribution by USA cable operators. In an online environment these restrictions are imposed by the programmer based upon the inbound IP address (International/Country code specific) used to gain access to the portals/apps/players. International travelers should be aware of these limitations and understand that service may not be available outside of the US.
Watch TV Everywhere Channel Lineup

*Updated: October 27, 2021
What are “Streaming Alternatives?”
Live TV streaming alternatives (such as YouTube TV, Hulu + Live TV, Sling TV, Paramount+, FuboTV, and more) deliver live TV to your home via the Internet and an Internet-connected streaming device that you purchase and own. The streaming alternatives discussed here differ from subscription Video On Demand (sVOD) services such as Netflix and Disney+ in that they deliver live TV instead of (or in addition to) providing a library of previously aired content. Live TV streaming alternatives can bring a welcomed reduction to your monthly TV bill (when compared to Traditional Cable TV service), but the tradeoff is that you will likely have access to fewer channels. Depending on which streaming service(s) you select, you will likely have a greater ability to “pick and choose” which networks you subscribe to, but you will likely not have the full channel lineup that is available with Traditional Cable TV.
It is crucial to remember: in order to stream, your Internet connection must have sufficient speed and reliability. If you are considering “cutting the cord” and dropping your Traditional Cable TV in favor of streaming, contact us to 2x your speed for 3 months at no extra charge (after the trial, you will begin to be charged the monthly incremental difference, but you are under no obligation to keep the faster speed and can cancel at any time).
Please know that we want you to have the best TV solution for your needs – whether that’s a CLtel product or not. Stop into the CLtel Experience Zone, where you can see the various streaming services and devices firsthand, and one of our expert Customer Service Representatives will help find the right streaming alternative for you. You can also visit www.mybundle.tv or www.suppose.tv to use their free comparison tools.
How do I stream?
We recommend that you:
- Get a fast and reliable CLtel Internet connection.
- Contact us to 2x your speed for 3 months at no extra charge (after the trial, you will begin to be charged the monthly incremental difference, but you are under no obligation to keep the faster speed and can cancel at any time).
- Purchase and install a streaming device such as a Roku, an Apple TV, or an Amazon Fire TV. If you have a Smart TV, you may be able to use the apps that are accessible on the TV itself, eliminating the need to purchase a separate streaming device.
- Visit www.mybundle.tv, www.suppose.tv, or the CLtel Experience Zone to evaluate which streaming service(s) you would like to sign up for.
- Sign up for the services you would like, either through your streaming device itself or on the streaming service’s website.
That’s it! Happy streaming!
Recommended Live TV Streaming Alternatives
Depending on your needs, we recommend considering:
- *YouTube TV
- *Hulu + Live TV
- Paramount+
- Sling TV
- fuboTV
- DirecTV Stream
YouTube TV and Hulu + Live TV are by far the most popular live TV streaming alternatives in North Iowa.
Deciding Which Streaming Alternative is Right for You
There are many factors to consider when evaluating streaming alternatives, such as network availability, DVR capacity, number of simultaneous streams, number of devices, and more. Use the free comparison tools available at www.mybundle.tv and www.suppose.tv to evaluate, or visit the CLtel Experience Zone to see the various streaming services and devices firsthand.
TV On My Side
We don’t like TV rate hikes either. In order to operate our TV service, however, we must pass on the rate increases that the programmers assess to us. Read Why a Cable TV Bill Increases to learn more, and check out the Streaming Alternatives section above.
Troubleshooting
My TV Continually Displays “Press OK to View TV” Message When I Turn It On
When this occurs, the power command on your television and the power command on your cable box are out of sync. This can occur if you turn the TV on (or if you previously turned it off) with your manufacturer’s remote instead of with the CLtel TV remote. It can also occur if your CLtel TV remote is out of “STB mode,” which stands for “Set Top Box mode” (aka Cable Box mode). This can happen if one of the small buttons at the top of the remote are inadvertently pressed (such as TV, AUD, DVD, or VCR).
To fix: Press the STB button at the top right corner of your CLtel TV remote. This will place your remote back into STB mode and resync your cable box with your TV. When you are ready to turn off your TV, do so with your CLtel TV remote – not your TV manufacturer’s remote, as doing so will turn off the TV but not the cable box.
See “Using Your Traditional Cable TV Remote” under the Traditional Cable TV section of the Help Center for a description of the buttons and their location on the remote.
My TV Displays “No Signal”
- Check to make sure your TV is on the Input/Component/HDMI setting that corresponds with your Traditional Cable TV service. This is typically listed on a sticker on the back of your CLtel TV remote. You can also determine the correct Input/Component/HDMI by inspecting the physical ports on your TV and identifying which is being used to connect the cable box to the TV.
- Cycle through the inputs until you reach the one corresponding with your CLtel TV service. You can do this with the Input (or similar) button on your TV manufacturer’s remote, or you can do it with your CLtel TV remote:
- Press the TV button at the top left corner of the remote. This places the remote into “TV mode” and allows it to control the TV instead of the cable box.
- Press the Input button at the lower left corner of the remote and continue pressing it until you reach the Input/Component/HDMI where your CLtel TV service is visible.
- Press the STB button at the top right corner of the CLtel remote. This places the remote back into “STB mode,” which stands for Set Top Box mode (aka Cable Box mode), and allows you to once again use the remote to communicate with the cable box and navigate your CLtel TV service.
See “Using Your Traditional Cable TV Remote” under the Traditional Cable TV section of the Help Center for a description of the buttons and their location on the remote.
Nothing Happens When I Press Buttons on My Traditional Cable TV Remote
Are you able to turn the TV on with your CLtel TV remote?
- No
- The batteries in your remote may be dead. Swap your remote’s current batteries with fresh batteries and try again.
- If you are still unable to control your TV after changing your remote’s batteries, you may need a new remote. Please contact us for assistance.
- Yes
- Your remote may be out of “STB mode,” which stands for “Set Top Box mode” (aka Cable Box mode). This can happen if one of the small buttons at the top of the remote are inadvertently pressed (such as TV, AUD, DVD, or VCR). Press the STB button at the top right corner of your CLtel TV remote. This will shift your remote back into STB mode and allow it to communicate with the cable box.
- If you are able to turn on your TV with your CLtel TV remote and pressing the STB button does not resolve the issue, you may need to reprogram your remote. See the “Reprogramming Your Remote Control” section below or contact us for assistance.
- If you are able to turn on your TV with your CLtel TV remote and neither pressing the STB button nor reprogramming the remote restores its capability, you may need to reboot your cable box.
- Locate the power supply on the back of your cable box. The power supply is a thin cord with a round connector. You can also find the power supply by tracing the cord that is connected to the power outlet back to the cable box.
- Unplug the power supply and keep it unplugged for ten seconds.
- Plug the power supply back in, and wait a few minutes for the cable box to restart.
- If this does not resolve the issue, please contact us to troubleshoot further.
See “Using Your Traditional Cable TV Remote” under the Traditional Cable TV section of the Help Center for a description of the buttons and their location on the remote.
Guide Button Not Working
Are you able to turn the TV on with your CLtel TV remote?
- No
- The batteries in your remote may be dead. Swap your remote’s current batteries with fresh batteries and try again.
- If you are still unable to control your TV after changing your remote’s batteries, you may need a new remote. Please contact us for assistance.
- Yes
- Your remote may be out of “STB mode,” which stands for “Set Top Box mode” (aka Cable Box mode). This can happen if one of the small buttons at the top of the remote are inadvertently pressed (such as TV, AUD, DVD, or VCR). Press the STB button at the top right corner of your CLtel TV remote. This will shift your remote back into STB mode and should allow you to navigate the guide.
- If you are able to turn on your TV with your CLtel TV remote and pressing the STB button does not resolve the issue, you may need to reprogram your remote. See the “Reprogramming Your Remote Control” section below or contact us for assistance.
- If you are able to turn on your TV with your CLtel TV remote and neither pressing the STB button nor reprogramming the remote restores its capability, you may need to reboot your cable box.
- Locate the power supply on the back of your cable box. The power supply is a thin cord with a round connector. You can also find the power supply by tracing the cord that is connected to the power outlet back to the cable box.
- Unplug the power supply and keep it unplugged for ten seconds.
- Plug the power supply back in, and wait a few minutes for the cable box to restart.
- If this does not resolve the issue, please contact us to troubleshoot further.
See “Using Your Traditional Cable TV Remote” under the Traditional Cable TV section of the Help Center for a description of the buttons and their location on the remote.
Weather Button Not Working
Are you able to use other buttons on your CLtel TV remote?
- No
- Your remote may be out of “STB mode,” which stands for “Set Top Box mode” (aka Cable Box mode). This can happen if one of the small buttons at the top of the remote are inadvertently pressed (such as TV, AUD, DVD, or VCR). Press the STB button at the top right corner of your CLtel TV remote. This will shift your remote back into STB mode and should allow you to navigate the Weather features.
- If pressing the STB button does not resolve the issue, you may need to reprogram your remote. See the “Reprogramming Your Remote Control” section below or contact us for assistance.
- If the previous two steps do not work, ensure that the batteries in your remote are not dead. Swap your remote’s current batteries with fresh batteries and try again.
- If you are still unable to use any buttons on your remote after pressing the STB button, attempting to reprogram the remote, and swapping the remote’s batteries, you may need a new remote. Please contact us for assistance.
- Yes
- You may need to reboot your cable box.
- Locate the power supply on the back of your cable box. The power supply is a thin cord with a round connector. You can also find the power supply by tracing the cord that is connected to the power outlet back to the cable box.
- Unplug the power supply and keep it unplugged for ten seconds.
- Plug the power supply back in, and wait a few minutes for the cable box to restart.
- If this does not resolve the issue, please contact us to troubleshoot further.
- You may need to reboot your cable box.
See “Using Your Traditional Cable TV Remote” under the Traditional Cable TV section of the Help Center for a description of the buttons and their location on the remote.
TV Won’t Turn Off
When this occurs, the power command on your television and the power command on your cable box are out of sync. This can occur if your CLtel TV remote is out of “STB mode,” which stands for “Set Top Box mode” (aka Cable Box mode). This can happen if one of the small buttons at the top of the remote are inadvertently pressed (such as TV, AUD, DVD, or VCR).
To fix: Press the STB button at the top right corner of your CLtel TV remote. This will place your remote back into STB mode and resync your cable box with your TV.
See “Using Your Traditional Cable TV Remote” under the Traditional Cable TV section of the Help Center for a description of the buttons and their location on the remote.
When Turned On, TV Shows Only a Black Screen
- Check to make sure your TV is on the Input/Component/HDMI setting that corresponds with your Traditional Cable TV service. This is typically listed on a sticker on the back of your CLtel TV remote. You can also determine the correct Input/Component/HDMI by inspecting the physical ports on your TV and identifying which is being used to connect the cable box to the TV.
- Cycle through the inputs until you reach the one corresponding with your CLtel TV service. You can do this with the Input (or similar) button on your TV manufacturer’s remote, or you can do it with your CLtel TV remote:
- Press the TV button at the top left corner of the remote. This places the remote into “TV mode” and allows it to control the TV instead of the cable box.
- Press the Input button at the lower left corner of the remote and continue pressing it until you reach the Input/Component/HDMI where your CLtel TV service is visible.
- Press the STB button at the top right corner of the CLtel remote. This places the remote back into “STB mode,” which stands for Set Top Box mode (aka Cable Box mode), and allows you to once again use the remote to communicate with the cable box and navigate your CLtel TV service.
See “Using Your Traditional Cable TV Remote” under the Traditional Cable TV section of the Help Center for a description of the buttons and their location on the remote.
On Demand Default PIN
The default Video-On-Demand PIN is 0000. This may be changed within the Settings of the On Demand menu at any time.
I Can Change Channels, But I Can’t Control the Volume
- Your remote may be out of “STB mode,” which stands for “Set Top Box mode” (aka Cable Box mode). This can happen if one of the small buttons at the top of the remote are inadvertently pressed (such as TV, AUD, DVD, or VCR). Press the STB button at the top right corner of your CLtel TV remote. This will shift your remote back into STB mode and should allow you to adjust the TV’s volume once again.
- If pressing the STB button does not resolve the issue, you may need to reboot your cable box.
- Locate the power supply on the back of your cable box. The power supply is a thin cord with a round connector. You can also find the power supply by tracing the cord that is connected to the power outlet back to the cable box.
- Unplug the power supply and keep it unplugged for ten seconds.
- Plug the power supply back in, and wait a few minutes for the cable box to restart.
If this does not resolve the issue, please contact us to troubleshoot further.
See “Using Your Traditional Cable TV Remote” under the Traditional Cable TV section of the Help Center for a description of the buttons and their location on the remote.
I Have Video, But I Can’t Change Channels
- Your remote may be out of “STB mode,” which stands for “Set Top Box mode” (aka Cable Box mode). This can happen if one of the small buttons at the top of the remote are inadvertently pressed (such as TV, AUD, DVD, or VCR). Press the STB button at the top right corner of your CLtel TV remote. This will shift your remote back into STB mode and should allow you to change channels once again.
- If pressing the STB button does not resolve the issue, you may need to reboot your cable box.
- Locate the power supply on the back of your cable box. The power supply is a thin cord with a round connector. You can also find the power supply by tracing the cord that is connected to the power outlet back to the cable box.
- Unplug the power supply and keep it unplugged for ten seconds.
- Plug the power supply back in, and wait a few minutes for the cable box to restart.
- If this does not resolve the issue, please contact us to troubleshoot further.
See “Using Your Traditional Cable TV Remote” under the Traditional Cable TV section of the Help Center for a description of the buttons and their location on the remote.